By: SP Genevac
What do we mean by “High Boiling Point”?
Usually we mean things with a boiling point significantly higher than water.
The graph below shows a range of solvents, with two well known HBP solvents,
- DMF (Dimethylformamide )
- DMSO (Dimethylsulfoxide) occurring to the left of water (which is in yellow) on the graph.

Other commonly used HBP solvents include NMP (N-Methyl-pyrrolidone), DMAc (Di-Methyl-Acetamide).
Many people believe these solvents are “difficult” or “slow” to remove. This is actually not the case provided that you do things the right way. Read on for more information.
What are the key things to remember?
There are two main points (which will be explained more fully below).
• Always pre-heat the evaporator chamber to prevent condensation
• You need full vacuum (or as close as you can get to full vacuum)
If you take nothing else away from reading this document, remember these two things.
1 Chamber Heating
When evaporating a volatile solvent such as methanol you will probably be removing solvent with a boiling point (at the pressure present in the chamber) of -20oC or less. This requires a very cold condenser to capture the vapour.
But with HBP solvents, the solvent ‘s BP may be as high as +25oC (or more). This presents an entirely different challenge, because it is in fact too easy to condense. It will condense on any object it comes into contact with that is less than 25oC (or whatever the boiling point is). If the right precautions are not taken, this might be the chamber walls, the rotor or the pipework to the condenser.
All Genevac HT systems have chamber heaters, which enable the system to warm the aluminium chamber.
Preheating the chamber in a Genevac Series II instrument is very straightforward. When setting the parameters for the run in question, set “Chamber Heat” to “Wait to Heat” and 40 degrees. This means that the system will not start until the chamber is up to at least 40oC. When you press “Start” to commence the run, you will see a message “Pre-heating chamber” on screen, and the system will not start to spin the rotor (or pump down to vacuum) until the chamber has reached the desired temperature.
You only have to program this in once, and from then on it will be implemented every time you run this program.
There is a certain delay associated with pre-heating the chamber. Some users may be so short of time they wish to circumvent this delay. Do not be tempted to save time by missing out the pre-heat stage – condensation of DMSO (or similar) in the chamber is so messy to clean up that you will regret such false economy very soon.
If the time penalty of the pre-heating really bothers you, look at the “Advanced techniques” section at the end of this document for ways to get the job done faster.
2 Full Vacuum
Before dealing with this topic, let’s go over how Genevac’s temperature control system works.
Inside the chamber, stationary infra-red lamps shine onto the metal swing or sample holder (depending on the format used) as it spins past, and heat is then conducted from there into the samples. It is this heat flow that fuels the removal of solvent. When the solvent is boiling, the sample temperature is governed by the boiling point of the solvent, but when the solvent is gone and the sample is dry, the sample temperature rises up to meet the temperature at which the sample holder (or swing) is controlled.
To ensure that the sample is never overheated, Genevac systems keep the swing (or sample holder) at a temperature no greater than the maximum permissible temperature for the sample, throughout the evaporation run. The amount of heat flow into the sample is governed by
• the heat flow resistance (which is down to the design of the sample holder and swing)
• the temperature difference between the swing (or sample holder) and the sample itself.
For example, a user might specify that the sample temperature must not exceed 40oC . Thus the swing will never go above this temperature. If the solvent was a typical volatile solvent, the boiling point might be -20oC or less, and so there would be 60 degrees temperature difference between the swing and the boiling sample. This temperature difference will allow a lot of heat to flow into the sample, and boiling will be rapid.
But what if the sample was DMSO?
Furthermore, let’s say we tried to run the evaporation at 2 mbar. As the graph at the start of this document shows, DMSO at 2 mbar boils at something like 38oC. That means there would only be 2 degrees difference between swing and solution. This is a pitiful difference, and is not going to drive very much heat flow at all.
Evaporation of the DMSO would be painfully slow, if not non-existent. What if instead we got the pressure down to 1 mbar? Now the boiling point is more like 27oC. Now we have 13 degrees difference between the swing (at 40oC) and the boiling solvent. This will remove the solvent 6.5 times faster than at 2 mbar.
If we can get down to 0.5mbar we can get the boiling point down to 18oC, which means 22 degrees difference, 11 times faster than at 2 mbar.
The point here is clear. The better the level of vacuum, the faster you will remove the DMSO.
There are a few things to bear in mind here:
• Any leaks will have a significant impact on run times. Keep an eye on all door seals and ensure all pipe joints are tight after any maintenance.
• Pump performance is crucial. Some competitor’s pumps feature “gas ballast” to give the pump better solvent resistance and this reduces the ultimate vacuum level. Genevac’s unique “Cole pump” is vapour tolerant so does not need any such feature, and has maximum vacuum level performance even if solvents are passed through it.
• Maximum SampleGuard™ temperature has a big impact.
This last of these is quite significant. In the example above, we had a max temperature of 40oC, and a boiling point of 18oC, making a temperature difference of 22 degrees.
If we had instead had a maximum temperature of 50oC, the temperature difference would be 32 degrees, which means evaporation would proceed 45% faster.
So if you want to dry the samples faster, make sure you know exactly what your maximum permissible sample temperature is. Every extra degree you are safe to use will help.
In Summary
When programming for a HBP solvent, select the following parameters

Advanced Techniques
This section shows some things you can do if you want to get even more performance from your system.
1. Faster Running
The following pictures show runs using the Genevac simulation software (which is not available for customeruse but which all Genevac sales reps have access to).
For clarity we are just modelling a single microtitre plate with 0.75mls per well in each position of a 4 position Genevac HT4.
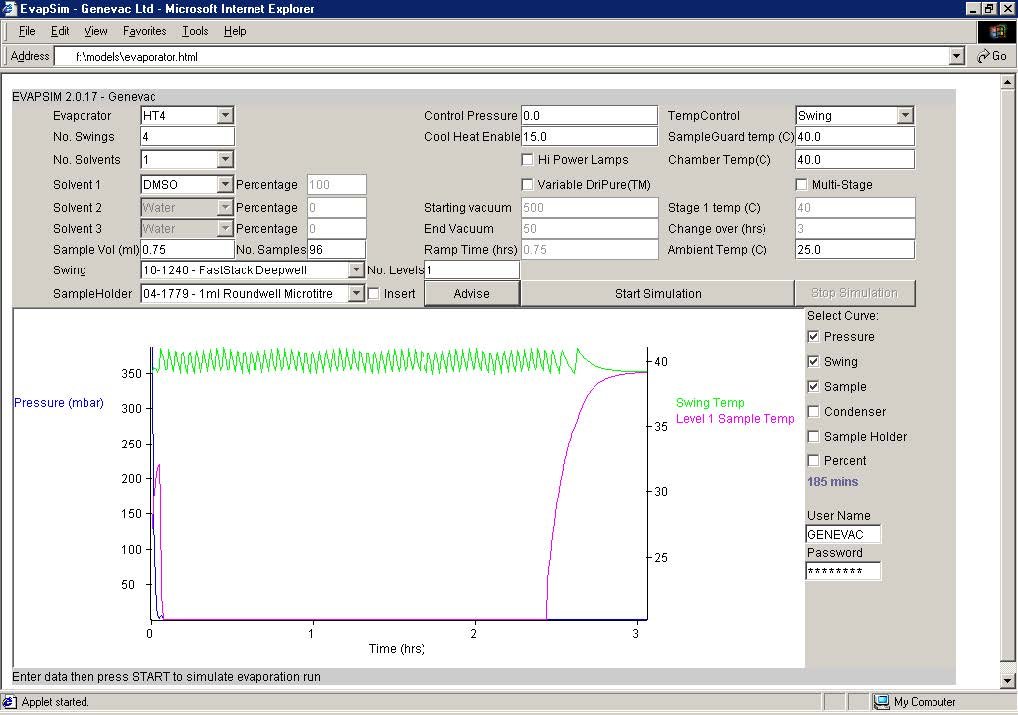
The pink “sample temperature” curve rises to meet the green swing temperature curve when the solvent is gone. So in this run, the solvent is gone after 2.5 hours.
Genevac Heat Transfer Plates
Now, microtitre plates are notoriously poor heat conductors, and this becomes a big issue in a situation (like with DMSO) where heat flow into the solvent is so important. In the next picture, you can see the difference when the patented Genevac “heat transfer plate” is used in conjunction with the microtitre plate.
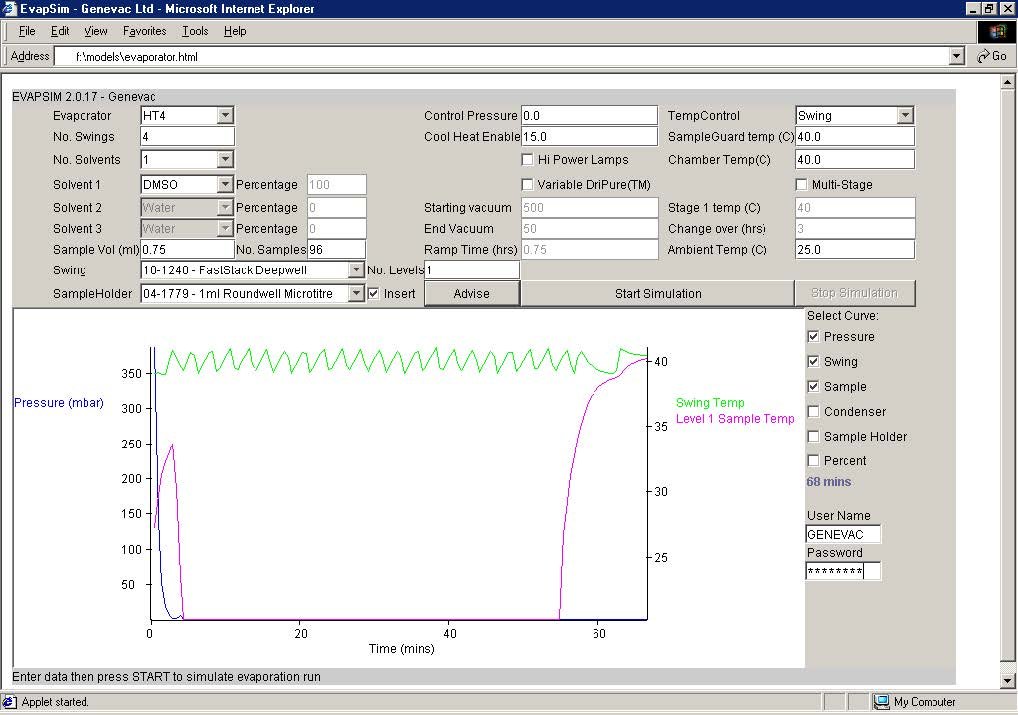
This has dried in under an hour.
Clearly these heat transfer plates can make a huge difference if you are using microtitre plates
If you are interested in these,
• download the Genevac “Accessories Brochure” from the Genevac website (a PDF file)
• find the “heat transfer plates”
• check that the microtitre plates that you use are one of the brands supported
• if so, get in touch with your sales rep, quoting a part number from our catalogue
Multi Stage Runs
There are other things you can do to speed up a run with an HBP solvent.
In the next example, we have taken advantage of the simple fact that while there is still some solvent in the samples, their temperature will be “held down” by boiling solvent. It is therefore possible to set the SampleGuard™ temperature higher than the max for the sample, provided that we return it to a safe level before any samples are dry.
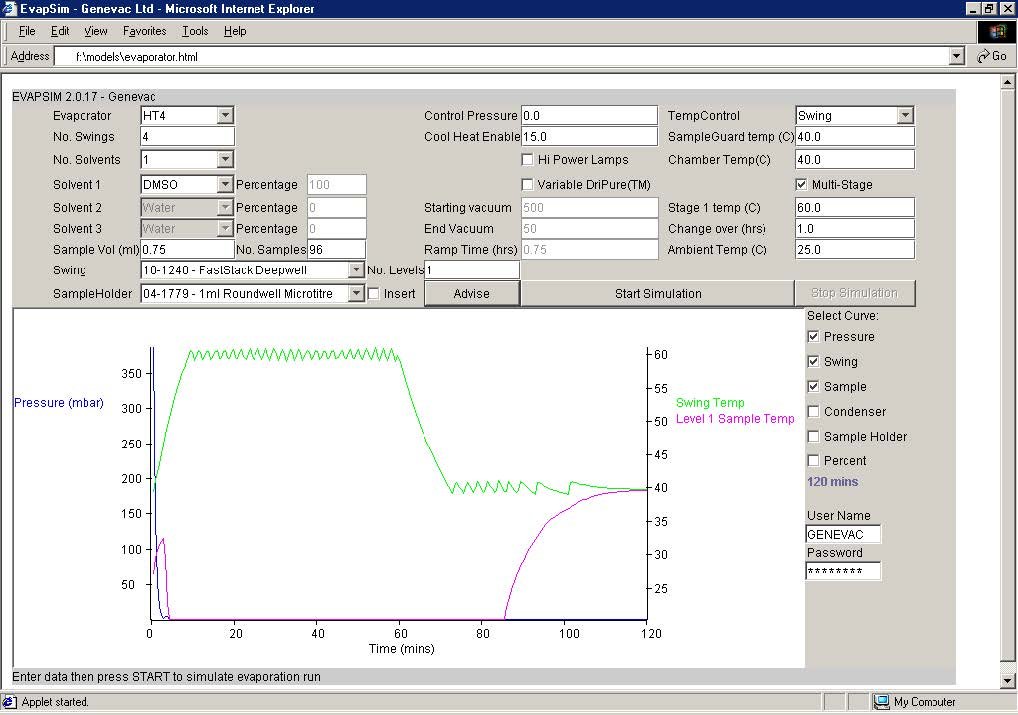
It can be seen that this technique reduces the runtime (though not as much as the use of the heat transfer plates). The technique must be used with care, however. If the initial hot stage is made too long, some samples may dry while the swing is still hot and be overheated.
To find out how long it is safe to make this first “hot” stage, do a trial run with
• the smallest amount of solvent you are likely to use (pure solvent, no actual samples)
• a second temperature probe connected to the SampleGuard™ channel 2 and dipped into an edge well of one of the microtitre plates
• Set the SampleGuard™ control temperature to the high figure you intend to use for the first “hot” stage.
• Watch the temperature recorded by the sample probe. At the end of drying it will rise. Record the time.
The edge wells are usually first to dry, so this test will tell you when the first wells in the plate are dry. This gives you an absolute maximum for the duration of the first “hot” stage.
In the previous example, runtime has come down from 2.5 hrs to under 90 minutes, and this is without any extra equipment or purchases, just some reprogramming.
Note that this example is purely an illustration, using one plate per swing. With two microtitre plates per swing, the savings would be from 4.5 to 3.5 hours. Not as impressive sounding but still significant.
Programming a multistage run on a Genevac Series II system is straightforward. Each program can link to another program when it finishes. The number of the run it will link to is shown on the 2nd line of the settings screen. If this is set to 0 then the run will not link to any other run.
2 Faster Preheating
Pre-heating the chamber before running with a HBP solvent (as part of the program) can be a lengthy process, taking up to 45 minutes, because it can only use the chamber heaters to heat the chamber.
There is an alternative approach.
What you do is write a dedicated two stage “preheat” program. This is something you run before putting the samples in, and which is entirely to warm up the evaporator chamber quickly.
NEVER run this program with samples already loaded.

What does this do?
The chamber is heated
• The swings are heated with full lamp power
• There is plenty of air in the chamber so the heat going into the swings passes to the chamber walls by air conduction
• There is a 3 minute period at the end where the lamps are off but the machine is still running. This is so that the swings are not too hot to touch when you load the machine.
After running this for 20 minutes (plus stopping time) you can then load the samples and begin the “real” run.
Note that the “real” run should still have “Wait to heat 40 deg” as its chamber heat settings. However, the time taken to get to target chamber temperature will be far less because the chamber will be most of the way to target temperature already.


